Category: Homestead

  • So much has changed

    It’s been so long since I have posted here. So many things are different.

    The fact that I have not been working is one of my dreams, NOT that I don’t want to work. Rather I want to work doing what I love… and I have been. So, though times are difficult and many people are struggling, for which I am tremendously sad, I have been flourishing! This extra time has allowed me to accomplish so many of the projects I have for myself. Still a very long way from completing them, however it feels amazing to be so productive.

    Another blessing is that my children are home more. <3 😀 Crazy schedules are gone, though in comparison with many other families ours was quite calm. My two teens are still working, my husband still has his job (so grateful for that, he would be wildly unhappy if he was trapped at home).

    In any case, in the coming days and weeks, I look forward to sharing some of the projects, crafts, ideas, organizing, recycling, and masks that I have been spending my time WORKING on.

    Until then, please be safe.

  • My sad garden

    My sad garden

    I started a bit late.

    The hectic schedules around here keep me on my toes and any plans I ever attempt are constantly thwarted by anything two teenage girls can come up with. For instance yesterday, the 15 year old technically still has school although finals were done last week. The time of her orthodontist appointment required me to pick her up from school. Between the school and the office I notice my Jeep was shimmy-ing at 55 mph, and a peculiar burning kind of smell. Everything else seemed OK, but being half an hour from home with a child made me anxious. Called my darling husband, if he says to go ahead and drive it home, I will. BUT he says he’s coming down (thank all that is good that he was HOME) and he will check it out. He does and it turns out I only need a new brakes, caliper, and rotor. However, my quick jaunt that I would have been home by 3:30 turned into all kinds of other tasks. Calling part stores, going to the store to retrieve said parts, calling on friends with a garage to impose on them to fix. UGH! It has to be done sooner than later as we are travelling next week.

    The silver lining…it happened while we were still here and not far from home.

    Back to the garden, it’s sad. I planted a few things: peas, kale, lettuce, carrots, watermelon, and beets. I also planted some cantaloupe seeds from a cantaloupe we had just eaten. When some of the seeds sprouted I was thrilled, then I realized I had no idea what it was. The seeds look like pumpkin seeds, but we didn’t have pumpkin. I thought they were cantaloupe, but they are too big.  What the heck did I plant?? I guess we will have to wait an see.

    I also thought, what the heck and put a couple of small potatoes in there, a garlic clove, an onion that had begun to sprout, and two green onions that were growing wild.

  • Summer is almost here!

    It’s quickly approaching one year since beginning my blog. I had hoped to already be moved, definitely further along with being self-sufficient, and having a thriving blog business. However, although it hasn’t happened yet, we are still proceeding in that direction.

    The school year is almost over, just 4 more days, then a wedding, a week to prepare for a little vacation, the vacation and BANG, serious time.

    Things have been going fairly well. The crafts I have been making are selling at Stacey’s shop. Well, actually, I hope, find out today as I pay her rent for the start of my 3rd month with her. Hopefully she has a generous check for me.  🙂  I am about to place a large order of supplies for my stock along with another piece of equipment to help with the process. My husband is always so agreeable. He sees my commitment much more than he has in the past, yes he never denies me whatever I look to pursue.

    The crafts are only a part of the plan. They will provide the fun and peace in my life…and maybe even some cash to pay for necessities.  😉

    Truly the most challenging thing is having teenage girls. The rough daily mental plan I make for myself each day generally gets tossed right out the window as soon as they wake up. Yesterday was the first day of high school finals. One child didn’t get to finish one test because of some issue which happened during the last class under the supervision of a substitute teacher. So, a make up test (??) involving staying after school seems to be in order. The other teen only has one exam so wishes to not remain at school the entire day. Meanwhile, I *am* still working, two schools are on half-day schedule, but the third is not. Both girls attend separate high schools, about 5 minute drive away from each other, but 30 minutes from our home. SO…do I go to work (driving) for 3 hours, drive 30 minutes to school #1, drive her home, go back to work and drive for 2 hours, drive to school #2, drive her back home, go back to work again for an hour to keep them happy? This means that the few moments I could accomplish *anything* would be gone AND I would be driving in the blistering heat of the third day in our heat wave. I hate sweating. Yes,my vehicle has AC, but my large yellow tin can does not. That’s assuming I have “my” bus as yesterday it was out of commission, having to borrow 2 others. Am I complaining? I kind of feel like I am complaining.  🙁 Have I mentioned that I don’t like to drive? I know, wacky that I am a bus driver, but remember, that was  means to an end. So I could drive the motor home coach.

    Sheesh! I have typed a book already and we haven’t even talked about dance. So much more to talk about, yet, no time. I’m going to get ready for the day – STAY COOL and enjoy yours. 🙂

  • Now what?

    So, lately I have been doing a lot of thinking about our homestead. The desire to make serious progress is there, what I have is a lack of direction. When I do not have a direction for anything I want to accomplish I get totally stuck. *SO* frustrating. Another thing that complicates this is that I find myself not only being relentlessly distracted, other folks in my home seem to think they need to provide me with things to do.

    As I write this I realize that the first thing that *must* happen is decluttering!

    By decluttering my life I will eliminate the need to clean, pick up, organize, put away, trash, wash, etc all these things around me. I have seen various social media outlets talking about simplifying, downsizing, and all, and I have cleared out quite a bit of stuff since we are still planning to move, but now I am thinking bigger scale.

    What does this mean? I am a sentimental fool. I keep everything, not like a hoarder, but I do keep lots of little momentos. For instance, growing up I would wonder about what I learned in first grade or what my penmanship was like. How I did on some random spelling test. Mom didn’t keep those things. Now as a mom, I have kept nearly every paper my kids brought home from school: artwork, projects, dang near everything. Each year they get a new backpack and the previous years backpack is filled with all their papers. We have a *LOT* of backpacks… When Honey and I were dating I was travelling cross country for my job and he was able to come with me. We’d see baseball games, have dinner, go to museums…every ticket stub, program, receipt – Yep, I’ve got ’em! The intent was to scrapbook them. 🙂 Unfortunately, that is still my intent, as in, it hasn’t happened yet. There always seems to be something else to do. sigh…

    TIME TO DECLUTTER!

    We have no plans this weekend, but to prepare the house for winter (put patio stuff away into the shed, rake, bring brush to the recycling center…). Honey just got the motorhome winterized today. I’m going to hide inside and organize! Make a giant donation pile and get it to our local homeless/near homeless faith-based non-for-profit pantry. What’s going? Anything that does not fit our current decorating style, we love rustic! If it can be used for our homestead, it can stay, but it must be useful. Another credential, it must be used!!! Beyond those requirements: if it’s for my craft room, it can stay. 😉 I have already begun regretting some craft things I have parted with…like my large bin of yarn. Of course I find several really cute ideas using yarn AFTER it’s gone. drat.

    I hesitate to take before pictures…at least of my basement…out of pure embarrassment. However, I will take them. Whether I actually share them likely depends on how drastic an improvement there is. Why? Because most of the stuff there is quasi-packed and ready to move. Months ago. Now there is random clutter on top of the boxes, some of the boxes are topless (no flaps or separate top to close them – totally messy looking), bunches of empty boxes, toys galore. It’s hideous!

    I imagine while cleaning I will be considering my next post, in fact, it’s certain. It will be about our next steps toward self-sufficient homesteading. Making a list to determine what we need, how to make it, what would be most beneficial to do first.

    If you don’t hear from me in the next week, tell my family to look for me in the playroom!

  • Recycling mind blown

    Eventually I would like to grow my own food and can it myself. Until then we have a healthy supply of store-bought canned goods.

    Recycling is very important to me. I’m not neurotic or anything, but every little bit helps. Conserving water, reusing gift bags, even the wrinkly old tissue paper. One of the easiest is cans from the canned goods. Cut off the top, use the stuff inside, rinse and add to the recycling box.

    …but what about the top?

    You can’t just leave that floating around, it’s crazy sharp and would definitely inflict a nasty wound. The solution is so simple, it will blow your mind!

    Don’t cut it all the way off! I merely cut most of the top leaving about 1/4″, after dumping out the contents, quick rinse and push the top inside. DONE! Safely recycling even more! YAY!

    can-1

    can-3

    can-4

    can-5

    can-6


  • Solar-powered solar-heater

    solar-heater-8-pin


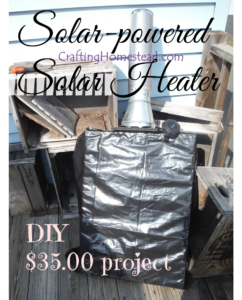
    That sounds redundant doesn’t it? I don’t know, maybe, but I don’t think so. See it’s solar-powered heat, the sun heats up the heater and the fan blasts (well…I’ll get specific on that later) the heat into the room.  The fan is solar-powered as well. So using the same sun, but for two different parts.

    OK, so here is how it works: The sun heats up the large black “box” while simultaneously charging the mini-solar panel. The mini-solar panel makes the fan turn which blows the hot air from the box into your room. Makes sense, right? I made this for about $35.  Perfect for me – nice and cheap!

    I will share what I would do differently first so you can decide how you want to proceed with your own.  Be sure to share your stories, I am eager to hear all about them! First thing is to be sure your fan is powerful enough to blow the hot air where you need it.  I salvaged my fan from a treadmill that no longer worked. It just isn’t strong enough to blow the hot air far enough.  I’ve seen some fans on end-of-season clearance, I expect to replace mine with one of those, fingers crossed, for about $5-10. Totally worth it. Design wise, I would plan a better top plate for connecting/covering the fan to the box. It works, so it’s functionally fine, just a little lot ugly.

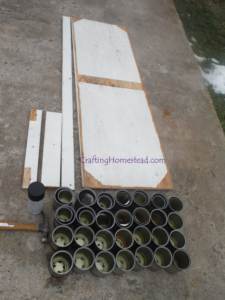
    Now to get started here is what you need I used:

    • Random piece of plywood, any thickness, mine is 1/2″ thick (free, recycled from a different project we had in our home)
    • several tin cans I have almost 50 (25 larger cans, 20ish smaller cans that easily fit inside) (free, lots of soup! Progresso and Campbell’s)
    • scrap 2″x4″ ‘s. (free, had them around)
    • black spray paint, optional ($6)
    • black plastic sheeting (or garbage bag, though mine is thicker, .4 mil)
    • fan (free, from old treadmill)
    • solar top from a walkway light fixture ($3)
    • aluminum dryer hose semi-rigid ($10)
    • hose clamp ($3)
    • duct 6″-4″ reducer ($8)
    • 4″ plastic drain cover ($5)
    • toggle switch ($3)
    • 2 pieces of screen (4″x4″ each) (free, had it from a recently torn screen)
    • assorted tools, like: *safety goggles*, saw, cordless drill, sheet metal cutter, screws, 2″ hole drill bit, 1/4″ drill bit for can holes, staple gun, staples, solder gun, solder wire, electrical tape, packing tape or duct tape.


    solar-heater-1


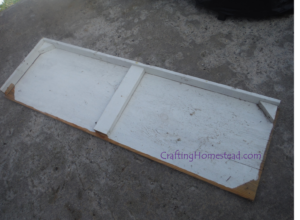
    Here is the plywood we had in a closet that was renovated a few months back. I kept it thinking I could make signs or something with it, but it will certainly suit me for this project. I removed the extra pieces leaving me with just plywood.

    From this piece I made the base, a 1″ strip (details later), and a 8″ square to attach the fan and duct reducer.


    solar-heater-9

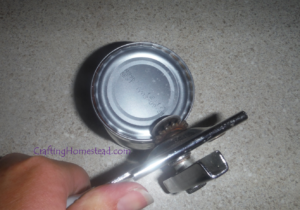
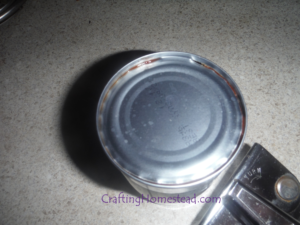
    After cleaning up all the soup cans I drilled 4 holes in the bottom of each large can (3 in the small cans) using a 1/4″ metal drill bit.  The small cans stay in the large cans in the box. Other plans I’ve seen do not utilize the additional cans, but I figured more metal would generate more heat. You can decide for yourself. The size of the box is determined by the size of the cans.  I didn’t measure anything. If you have more cans, you can make your box larger. It can be made smaller if you have fewer cans, just don’t expect as much heat.

    The holes allow the heat to escape the can and travel up and into the house. Other plans I’ve seen show removing the entire base of the can…not sure which works best.


    solar-heater-2

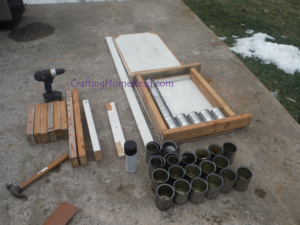
    Laid out the two side and the bottom pieces of 2×4. PERFECT! The width fits 5 cans. Had enough cans to go 5 high. Be sure to make the box slightly taller than the cans to allow for air flow. To be sure there is space between the cans and the bottom I added a 1″ wide strip of plywood about an inch from the bottom of the box, then allow an extra inch at the top. Cut all the wood to size.


    solar-heater-5

    After screwing all the pieces together I drilled a 2″ hole at the bottom and top, affixing the squares of screen on the bottom opening (one inside one outside, overkill perhaps, but I don’t like bugs inside the house.)

    Before inserting the cans, screw the 8″x8″ square with a 2″ hole to the 2″ hole at the top of the box.

    The cans are placed open end down inside to rest on the 1″ strip.

    Spray paint it black. This step likely isn’t necessary. Many of the solar heaters I have seen use a glass across the front of the box, so having the contents be black attracted more heat. Since I used black plastic, the heat is already being attracted.

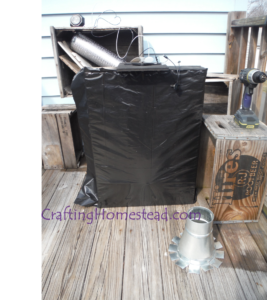
    Then staple the black sheet plastic to the front. My cans basically stay in place, but at some point I *may* remove the plastic and wire the cans in there tighter somehow. Be sure not to cover the bottom hole.


    solar-heater-3


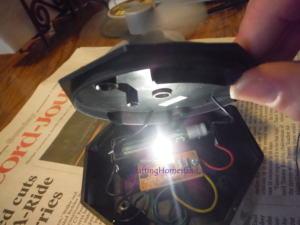
    Meanwhile, inside, I remove the base from a solar pathway light. It had been charging outside. You can see the light is on. Unscrew the cover to reveal the guts. This proved to be the trickiest part for me, having extra hands would be helpful here.  I soldered the fan wires to the ends of the battery compartment.

    ***CAUTION: depending which wire you attach to which end of the battery will reverse the direction the fan blows…don’t have your heated air blow back into the box. 😉

    I’ve also realized since assembling this that removing the light will be better for saving battery life. The light goes on in the dark, so the battery might not have enough power to get it going once the sun came back up.

    solar-heater-4


    That’s about the time I figured having a toggle switch would be useful, too. After the sun goes down I don’t want cold air blowing into the house…have to be able to turn off the fan. Can you see that it’s connected and spinning?


    solar-heater-6


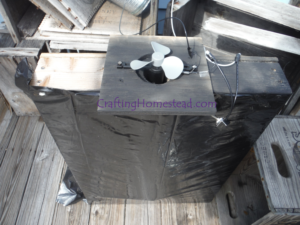
    See the fan at the top over the 8″x8″ square, off to the right are the wires for the toggle switch and the solar panel. Just wire in the toggle switch between the fan and the panel, use electrical tape on the connections. Secure the solar panel to the box in a way that doesn’t block the sun. Tape should hold it well enough.


    solar-heater-7


    In front of the box you can see the duct reducer. To be able to affix it to the 8×8 square I used sheet metal cutters to flare out the side, making tabs to be screwed down.

    Behind the box is the duct hose. I chose the semi-rigid because the price was the same, if one was cheaper I would have opted for less expensive.  With that said, if it were windy, I would want it to remain secure, not blowing around, so semi-rigid is sturdier.


    solar-heater-8

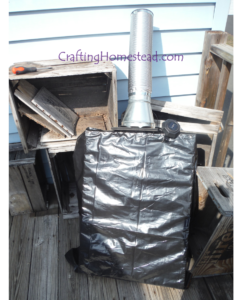
    Stick the drain cover to the end of the duct hose and begin enjoying some free day-time heat!


    OK, yeah, there has to be more than that, huh? So the drain cover end goes in the house, but the rest stays outside. This means you need an access point, like a window.  This is where my plans need tweaking. Where it sits in this picture is the best place for sun, but there is no window. We had a pellet stove on the other side of the wall. The stove pipe opening is off on the right, that’s where mine will go. After we move, the best place will be the smaller bathroom with a south-facing window. I will measure the window opening, cut a bit of plywood to fit, making it tall enough to accommodate the hose.


    Soooo, thank you for sticking with me on this winded description. 😉 It took me a couple weeks to make, only because of interruptions and other family obligations, but once you have the supplies, it can be a fun weekend project.


    UPDATE: Well, before I had a chance to upgrade my fan, we replaced our bathroom vent fan exhaust hose with, you guessed it…my semi-rigid duct hose.  🙁  Hubby even used the clamps.  Back to Lowe’s for me…maybe I’ll just save myself the trip and order from Amazon.  😉

  • I’m finally ready to start a blog.

    I have been tossing around the idea of starting a blog for at least a year.

    What should I write about? Who would actually read it? Would anybody read it?

    ARE YOU CRAZY? When do you have time to write a *blog*???

    Yeah, there is *no* time to write a blog. However, this little life of mine is whizzing right past me and my memory has proven over and over again to not be able to keep up.

    I want to document all these happenings. Someone might find something useful about my life (hahahaha, yeah right…more like a warning).

    Anyway, somewhere in between all the craziness that never seems to stop I am determined to create this journal of stuff. So bear with me while I learn to navigate creating a blog while also attempting to keep the kids entertained and stay on top of their chores, my chores, a new motorhome, preparing the house to sell, moving, birthdays, summer camp, and starting new schools in 2 months.

    Thanks for coming along for the ride!


Verified by MonsterInsights